
How To Use SSH IoT From Anywhere Free: The Ultimate Guide For Beginners
So, you’ve probably heard about SSH IoT and how it can help you access devices remotely without breaking the bank. But what exactly is SSH IoT, and how can you use it for free? This article is your go-to guide to understanding everything you need to know about remote device management using SSH IoT.
If you're like most people who work with IoT devices, the idea of controlling your gadgets from anywhere in the world sounds pretty sweet. But let’s face it—most premium solutions come with hefty price tags. Luckily, there’s a way to set up SSH IoT for free, and we’re about to spill all the tea on how to do it.
Before we dive into the nitty-gritty details, let’s get one thing straight: SSH IoT isn’t just for tech wizards or IT pros. Even if you’re a complete newbie, you can still rock this setup with ease. So grab your favorite drink, sit back, and let’s get started!
Read also:Mallory Plotnik The Rising Star In Entertainment Whorsquos Capturing Hearts
Here’s what we’ll cover in this article:
- What is SSH IoT and Why Should You Care?
- Setting Up SSH IoT for Free
- Tips for Securing Your SSH IoT Connections
- Common Issues and How to Fix Them
- How to Use SSH IoT on Different Platforms
- Advanced Techniques for Power Users
What is SSH IoT and Why Should You Care?
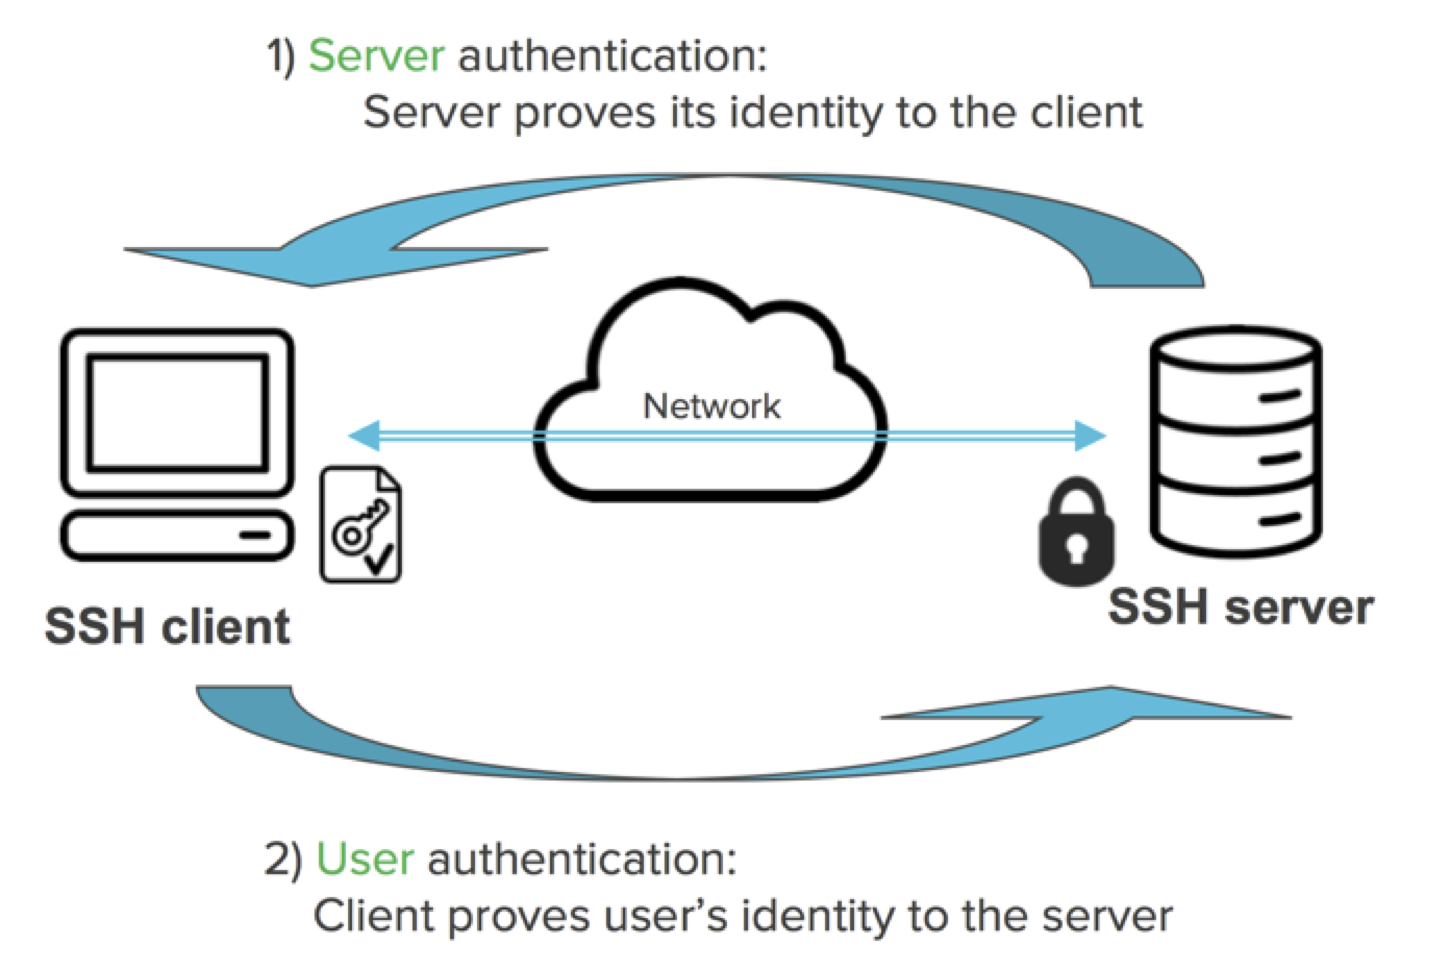
Alright, let’s break it down. SSH stands for Secure Shell, and it’s basically a protocol that allows you to securely connect to remote devices over the internet. When you add IoT (Internet of Things) to the mix, you’ve got yourself a powerful combo that lets you control smart devices from anywhere in the world.
But why should you care? Well, imagine being able to monitor your home security system, adjust your smart thermostat, or check on your pet camera while you’re on vacation. Sounds pretty awesome, right? Plus, using SSH IoT for free means you don’t have to shell out big bucks for expensive subscription services.
Key Benefits of Using SSH IoT
Let’s talk about the perks of SSH IoT:
- Security: SSH encrypts your data, so your connections are protected from prying eyes.
- Flexibility: You can manage a wide range of devices, from Raspberry Pi to smart home gadgets.
- Cost-Effective: With the right setup, you can enjoy all the benefits without spending a dime.
- Convenience: Access your devices anytime, anywhere, as long as you have an internet connection.
Setting Up SSH IoT for Free
Now that you know why SSH IoT is a game-changer, let’s talk about how to set it up for free. Don’t worry—it’s easier than you think!
Step 1: Choose Your IoT Device
The first step is to decide which IoT device you want to connect. Whether it’s a Raspberry Pi, a smart thermostat, or a security camera, make sure it supports SSH. Most modern IoT devices do, but it’s always a good idea to double-check.
Read also:Why Vegamoviesdo Is The Ultimate Destination For Movie Enthusiasts
Step 2: Install an SSH Client
Next, you’ll need an SSH client to establish the connection. There are plenty of free options out there, but some popular ones include:
- PuTTY: A classic choice for Windows users.
- OpenSSH: Comes pre-installed on most Linux and macOS systems.
- Termius: A user-friendly app for iOS and Android.
Just download and install the one that suits your platform best.
Step 3: Configure Your IoT Device
Once you’ve got your SSH client ready, it’s time to configure your IoT device. This usually involves enabling SSH in the device’s settings and noting down its IP address. If you’re not sure how to do this, check the device’s documentation or search online for specific instructions.
Step 4: Connect to Your Device
With everything set up, you can now connect to your IoT device using the SSH client. Simply enter the device’s IP address, username, and password, and you’re good to go!
Tips for Securing Your SSH IoT Connections
Security should always be a top priority when dealing with remote connections. Here are some tips to keep your SSH IoT setup safe:
- Use Strong Passwords: Avoid using common or easily guessable passwords.
- Enable Two-Factor Authentication: Add an extra layer of protection to your connections.
- Update Regularly: Keep your devices and software up to date to patch any vulnerabilities.
- Limit Access: Restrict SSH access to trusted IP addresses only.
Common Issues and How to Fix Them
Even with the best setup, you might run into a few hiccups along the way. Here are some common issues and their solutions:
Issue 1: Unable to Connect
If you can’t connect to your IoT device, make sure:
- Your device is turned on and connected to the internet.
- You’ve entered the correct IP address, username, and password.
- Firewall settings aren’t blocking the connection.
Issue 2: Slow Connection
A slow connection can be frustrating, but here’s how to fix it:
- Check your internet speed and ensure it meets the device’s requirements.
- Optimize your SSH settings for better performance.
- Consider using a wired connection instead of Wi-Fi for more stability.
How to Use SSH IoT on Different Platforms
SSH IoT works across various platforms, so you’re not limited to just one device or operating system. Here’s how to use it on different platforms:
Windows
On Windows, you can use PuTTY or the built-in SSH client in PowerShell. Simply open your preferred tool and enter the device’s IP address, username, and password to connect.
macOS and Linux
Both macOS and Linux come with OpenSSH pre-installed. To connect, open a terminal window and type:
ssh username@ip_address
Replace "username" and "ip_address" with your actual credentials.
iOS and Android
For mobile users, apps like Termius or JuiceSSH make it easy to connect to IoT devices on the go. Just download the app, enter your device’s details, and you’re ready to roll!
Advanced Techniques for Power Users
If you’re feeling adventurous, here are some advanced techniques to take your SSH IoT skills to the next level:
Port Forwarding
Port forwarding allows you to access your IoT devices from outside your local network. While it requires a bit more setup, it’s a great way to ensure remote access even when you’re not at home.
SSH Tunnels
SSH tunnels let you securely transfer data between devices. This is especially useful if you need to transfer files or stream data from your IoT devices.
How to Monitor Your IoT Devices with SSH
Monitoring your IoT devices is crucial for maintaining their performance and security. With SSH, you can easily check logs, update software, and troubleshoot issues from anywhere in the world.
Using SSH for Remote Logging
SSH allows you to access your device’s logs remotely, which is handy for diagnosing problems. Simply use the "cat" or "tail" command to view the logs:
cat /var/log/syslog
Automating Tasks with SSH
SSH can also be used to automate repetitive tasks, such as backups or software updates. By creating scripts and scheduling them to run at specific times, you can save yourself a ton of time and effort.
Conclusion: Time to Take Control of Your IoT Devices
And there you have it—your complete guide to using SSH IoT from anywhere for free. By following the steps outlined in this article, you can enjoy the convenience and security of remote device management without breaking the bank.
Remember, security is key when working with SSH IoT. Always use strong passwords, enable two-factor authentication, and keep your devices updated. And don’t forget to explore the advanced techniques we discussed to take your skills to the next level.
So what are you waiting for? Dive in, experiment, and take control of your IoT devices like a pro. And if you found this article helpful, be sure to share it with your friends and leave a comment below. Let’s keep the conversation going!
Article Recommendations

![How to Access IoT Devices Remotely with SSH [6 Easy Steps]](https://www.trio.so/blog/wp-content/uploads/2024/10/Access-IoT-Devices-Remotely-Using-SSH.webp)
