How To Use IoT SSH From Anywhere Free: Your Ultimate Guide
Hey there, tech enthusiasts! Are you ready to dive into the world of IoT and SSH? If you're wondering how to use IoT SSH from anywhere free, you've come to the right place. This guide will walk you through everything you need to know about setting up secure access to your devices from any corner of the globe. Whether you're a beginner or an advanced user, this article has got you covered. Let’s get started, shall we?
Imagine this: you're chilling at a café miles away from home, and suddenly you need to check on your smart home setup or access a file on your server. Sounds familiar? That’s where IoT SSH comes in handy. It allows you to remotely connect to your devices securely, without breaking the bank. And yes, we’re talking about doing it all for free!
Before we dive deeper, let me break it down for you. IoT SSH isn’t just about tech jargon; it’s about empowering you to take control of your devices no matter where you are. This article will cover everything from setting up your environment to troubleshooting common issues. So, buckle up, and let’s make this journey as smooth as possible!
Read also:Kirsten Toosweet Onlyfans Leaked The Untold Story You Need To Know
What Is IoT SSH and Why Should You Care?
Alright, let’s start with the basics. IoT SSH stands for Internet of Things Secure Shell. It’s a protocol that lets you remotely access and manage devices over the internet. Think of it as a secure tunnel that connects you to your gadgets, even when they’re miles away. Why should you care? Because in today’s connected world, having remote access to your devices is not just a luxury—it’s a necessity.
Here’s a quick rundown of why IoT SSH rocks:
- It’s secure, using encryption to protect your data.
- It’s versatile, working with a wide range of devices.
- It’s cost-effective, especially when you can set it up for free.
Now that you know what IoT SSH is, let’s talk about how you can use it to your advantage. Stick around, because the next section is packed with actionable tips!
Understanding the Basics of IoT SSH
Before we jump into the nitty-gritty, let’s break down the basics. When you’re setting up IoT SSH, there are a few key components you need to understand:
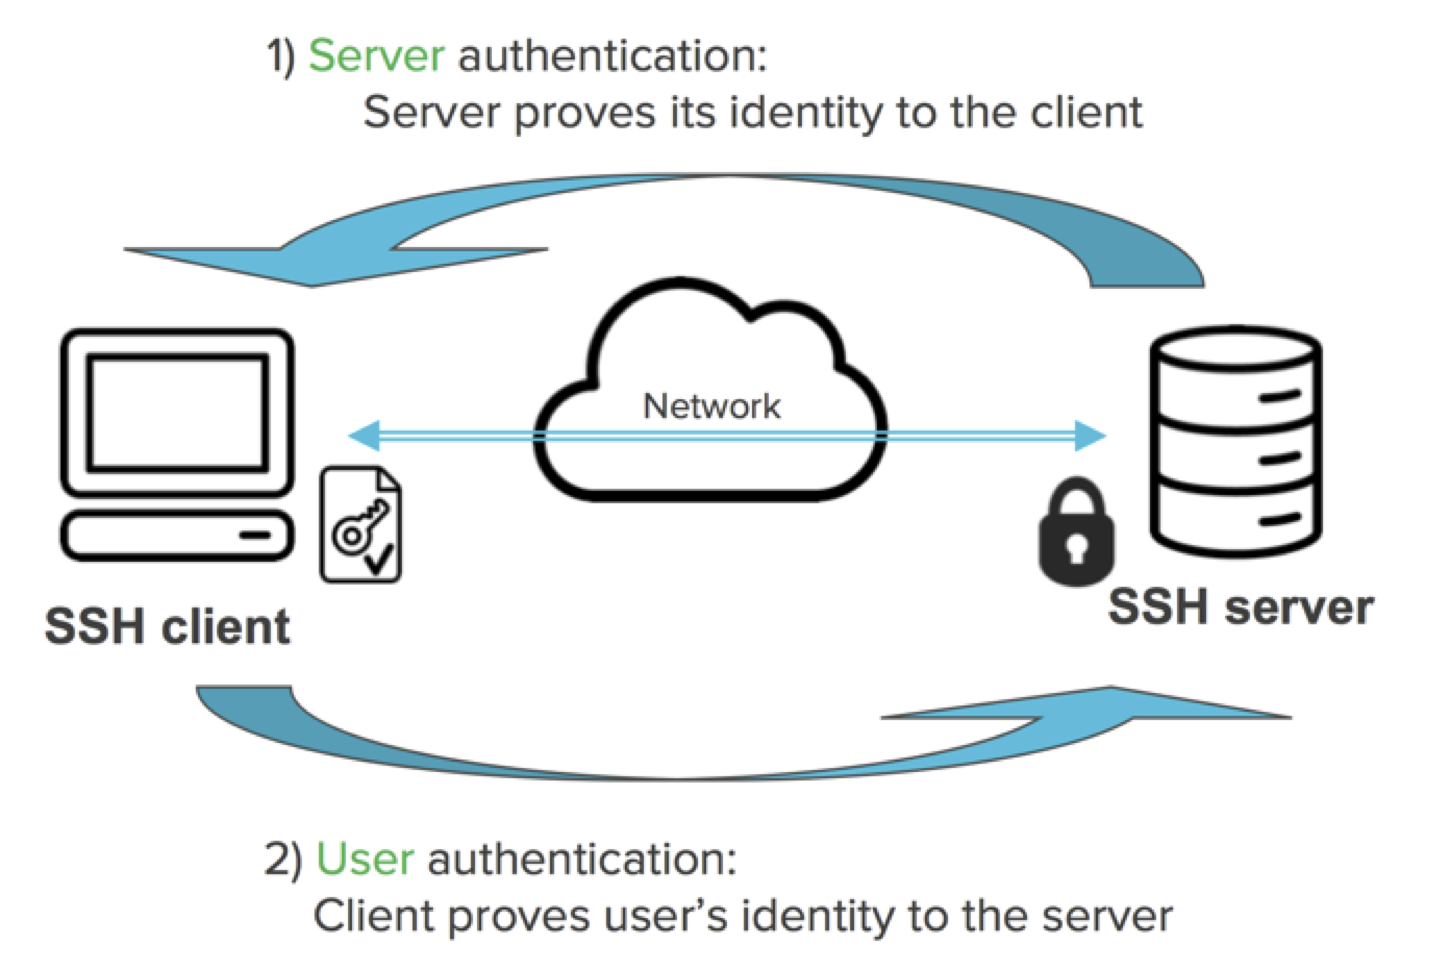
Public and Private Keys
Public and private keys are like a lock and key system for your devices. The public key is shared with the device you want to access, while the private key stays with you. This ensures that only you can unlock the connection. Pretty cool, right?
Ports and Port Forwarding
Ports are like doorways that allow data to flow in and out of your device. Port forwarding is the process of configuring your router to direct incoming traffic to the right device. This is crucial if you want to access your device from outside your local network.
Read also:Melissa Fumero Nudes Debunking Myths Understanding Privacy And Respecting Boundaries
Now that you’ve got the basics down, let’s move on to the fun part: setting everything up!
Step-by-Step Guide to Setting Up IoT SSH
Ready to roll up your sleeves? Here’s a step-by-step guide to setting up IoT SSH for free:
Step 1: Install an SSH Client
The first thing you need is an SSH client. For Windows users, PuTTY is a popular choice. If you’re on macOS or Linux, you’re in luck because SSH is already built into the terminal. Just open your terminal and type ssh to get started.
Step 2: Generate Public and Private Keys
Next, you’ll need to generate your public and private keys. On Linux or macOS, you can do this by running the following command in your terminal:
ssh-keygen -t rsa -b 4096
This will create a key pair in your ~/.ssh directory. Make sure to keep your private key safe!
Step 3: Configure Port Forwarding
Head over to your router’s settings and configure port forwarding. You’ll need to forward port 22 (the default SSH port) to the IP address of the device you want to access. This step might vary depending on your router, so check your router’s manual if you’re unsure.
With these steps in place, you’re ready to move on to the next level of IoT SSH mastery!
Tips for Securing Your IoT SSH Connection
Security should always be your top priority when setting up IoT SSH. Here are a few tips to keep your connection safe:
- Use strong, unique passwords for your devices.
- Change the default SSH port to something less obvious.
- Enable two-factor authentication (2FA) if your device supports it.
Remember, security isn’t just about protecting your data—it’s about protecting your peace of mind. Follow these tips, and you’ll be good to go!
Common Issues and How to Troubleshoot Them
Even the best-laid plans can hit a snag. Here are some common issues you might encounter when setting up IoT SSH and how to fix them:
Issue 1: Connection Refused
If you’re getting a "connection refused" error, double-check your port forwarding settings. Make sure the port is open and pointing to the correct IP address.
Issue 2: Authentication Failed
This usually happens if your public key isn’t properly configured on the device. Re-upload your public key and try again.
By addressing these issues, you’ll ensure a smoother experience with IoT SSH.
Exploring Free Tools for IoT SSH
Let’s talk about some awesome free tools that can make your IoT SSH journey easier:
Tool 1: ngrok
ngrok is a fantastic tool that lets you expose your local server to the internet. It’s super easy to set up and works great for testing and development purposes.
Tool 2: LocalTunnel
LocalTunnel is another great option for creating temporary public URLs for your local servers. It’s lightweight and doesn’t require any configuration.
These tools are perfect if you’re just starting out and don’t want to invest in expensive hardware or software.
Best Practices for Using IoT SSH
To get the most out of IoT SSH, here are some best practices to keep in mind:
- Regularly update your devices to patch security vulnerabilities.
- Limit access to trusted IP addresses whenever possible.
- Document your setup process so you can easily troubleshoot issues later.
Following these best practices will help you avoid common pitfalls and ensure a smoother experience.
How IoT SSH Can Transform Your Workflow
IoT SSH isn’t just about accessing your devices remotely; it’s about transforming the way you work. Imagine being able to troubleshoot issues on your server from the comfort of your couch or monitor your smart home setup while you’re on vacation. The possibilities are endless!
Here are a few ways IoT SSH can enhance your workflow:
- Remote system monitoring and maintenance.
- Access to critical files and data from anywhere.
- Collaboration with team members in real time.
With IoT SSH, the world truly becomes your office!
Future Trends in IoT SSH
As technology continues to evolve, so does IoT SSH. Here are a few trends to watch out for:
Trend 1: Enhanced Security Measures
With the rise in cyber threats, security is becoming more important than ever. Expect to see more advanced encryption methods and authentication protocols in the future.
Trend 2: Integration with AI
Artificial intelligence is starting to play a bigger role in IoT SSH. AI-powered systems can help automate tasks, detect anomalies, and improve overall efficiency.
Stay tuned for these exciting developments and see how they can benefit your IoT SSH setup!
Conclusion: Take Control of Your Devices, Anywhere, Anytime
Well, there you have it—a comprehensive guide on how to use IoT SSH from anywhere free. By following the steps outlined in this article, you can set up a secure and reliable connection to your devices no matter where you are. Remember to prioritize security, explore free tools, and keep up with the latest trends.
Now it’s your turn to take action! Try out the tips and tricks we’ve shared, and don’t forget to leave a comment below with your thoughts. If you found this article helpful, feel free to share it with your friends and colleagues. Happy SSH-ing, and see you in the next one!
Table of Contents
- What Is IoT SSH and Why Should You Care?
- Understanding the Basics of IoT SSH
- Step-by-Step Guide to Setting Up IoT SSH
- Tips for Securing Your IoT SSH Connection
- Common Issues and How to Troubleshoot Them
- Exploring Free Tools for IoT SSH
- Best Practices for Using IoT SSH
- How IoT SSH Can Transform Your Workflow
- Future Trends in IoT SSH
- Conclusion
Article Recommendations